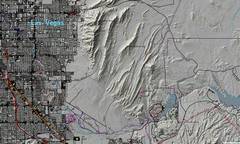
 Context map |
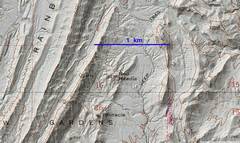 zoom in. LIDAR DEM adds a lot of detail. |
 Ah, love in the time of covid-19 |
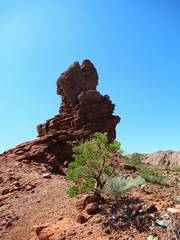
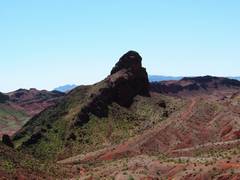
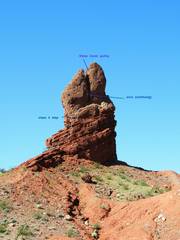 View of needle from the east. |
 This is the class 4 step; I climbed it with a large pack, and descended facing out; there are great foot placements if you look carefully. It is BELOW the crux. |
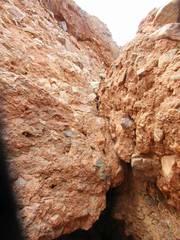
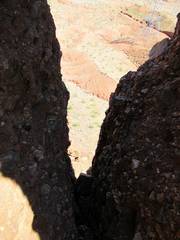
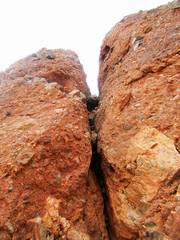 Now we are looking up the overhanging gully. Strategy is to sling the lowest chockstone. PROBLEM: The crack pinches down to 3-4" just below the chockstone. Whatever aid method you use, you will likely need to climb out of crack before you can get over the stone. |
 I got a 8mm rope over the pair of lowest chockstones; my aid was two schwabisch knots. |
 Now I'm above the crux; Pinnacle is to S, just L of the wall |
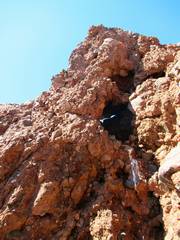 This is the crumbly gully for the last push to the summit. Rock is bad, and there is a big drop right below gully. |
 View back east down ascent gully. |
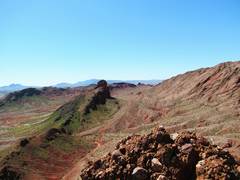 View of Pinnacle to SSW from Red Needle. |
 Some people said I "faked" this climb. Try faking this. Give me a break. |
 Sling left by Adam Walker and Matt Below, made from an old climbing rope left on top. I left a 4000 lb Dyneema sling. |
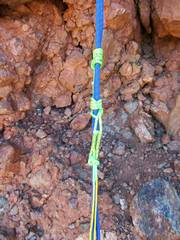
 View back up crux. My aid rope is dark blue at L. At R is 3.2mm dyneema I used as rap rope, with supermunter on a carabiner. |
 View on descent, foreshortened (looking UP). |
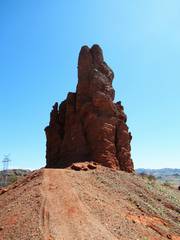 View of Red Needle from N |
 Pinnacle from N |
 Red Needle from NNE |
Aid A very good and daring climber can probably get past the overhang without "aid," but the crumbly rock does not inspire confidence. Here are some thoughts. I had seen pictures of a sling over the bottom chockstone, so I knew it would take some weight. It is wedged in between cobbles in the mudstone, and so far has taken a fair amount of weight; but this trust shouldn't last forever, particularly after a rainy day... YMMV. To my mind, "aid" climbing involves weighting something that you have attached to the rock, and I don't know of anyone who has lead-climbed this peak by rope methods, without first slinging the chockstone and weighting the sling. Here are some ideas. 1) Drop a rope over one or two bottom chockstones. This was the method I used. I'm only 5'6", and the entire right side of my body is partly paralyzed, including my right dominant hand. Still I was able to climb about 4' up, so the chockstones were only about 2 feet above my head. One can modify a cheap aluminum extension pole so it can drop a weighted rope over the chockstones; it is important to make a top extension that sticks out perpendicularly and overhangs about a foot, and make the rings that direct the rope as low-friction as possible, so the rope will slip easily down behind the stone. (an analogy for climbers is "rope drag" through carabiners; you don't want that!) I used a 10 oz. arborist weight; I think a 14 oz. weight might have been smarter. I had to reach up and pull that end of the rope down. You really only need about 20' of 8-9mm rope. Then tie your favorite friction knots for leg and harness loops, and ascend the paired ropes. You will get jammed in near the chockstone, and will have to reach left (south) to a good cobble hold, and then must be very flexible to squeeze in, while somehow finding a way to loosen the friction knots. This is the only truly hard part of the climb. 2) If you are tall and have good aim, you can do a "baseball throw" with the weighted rope, over the chockstone. I tried this 3 times, *almost* making it over 3 times! But my dominant hand is partly paralyzed, so an able person would have better "luck." 3) Hoist an etrier. You will need to get a rope over the chockstone as in (1); one side of the rope will go over the FRONT of the chockstone, and one over the BACK. Before sending the rope over the chockstone, tie a directional figure 8-on-a-bight, with the loop pointind toward you, at about the middle of the FRONT rope. Clip a carabiner to the top of the etrier. Tie a loose clove hitch (at least 1" gap through the loops) on the FRONT rope strand, about 18" below the figure 8, and put the etrier carabiner through the loops; it will hang at the bottom of the loops. DO NOT TIGHTEN the clove hitch. Put the back strand of rope down through both loops of the clove hitch, in the back side (BUT NOT THROUGH THE BINER). Pull the back strand down hard, hoisting the etrier to the bottom of the chockstone, with the figure 8 flipping over the far side; pull hard first on the back, then the front ropes, to make sure the knot has cinched. The clove hitch will be remarkably tight, but not failsafe, until you pull the bight around and clip it into the biner. You will need to untie the clove hitch before you descend (start by pulling out the biner). I've tried this many times with the rope over a 10"-thick tree branch, BUT NOT WITH THE CHOCKSTONE. I highly recommend you try this on a tree first and have a backup. YMMV a lot. 4) Ladder. Currently one can drive very close to the base of Red Needle. Tracy Foutz initially used a 15' extension ladder to overcome the overhang; we've used that same ladder to good effect in much rougher places ( e.g. here). To overcome just the first chockstone, you can probably get by with a very light single-piece aluminum ladder, maybe just 12', possibly no heavier than that useless rack you were about to bring. Once you get over the 1st chockstone, nothing requires aid, and the best protection is just to have a confident leader trail a rope. The biggest danger is loose pieces of crap that will bouce off your helmet. One of the bigger chockstones seems to "rock" a bit, so just test every potential hold about 3x. The rock is so textured and frictional, you might leave the rock shoes in the car and just wear approach shoes (or even athletic shoes) with lugs. Roads There are decent roads from both north and south, basically following the Lava Butte Road which is modest 4x4 (really just HC). Google maps will actually route one along the southern access. The trick is when one gets near Red Needle. From the south, the Lava Butte Road runs NE-NNE between ridges for 2 miles, then starts to descend and turns gradually east, then ESE and across the valley. On the right are three smaller roads; the 1st (westmost) has a sign that says "authorized personnel only;" the next road is very steep; and the 3rd is in good shape, has no restrictive sign, and heads very sharp right (west) and up the hill. You are now off the Lava Butte Road and can see Red Needle to the SSW. The details of the roads are in this gpx file. (Right click the link -- or whatever [long press on tablet], to "save link" or "save as.") Geology The red and tan rocks are SEDIMENTARY facies of the Thumb Member of the Miocene Horse Springs Formation. Specifically, the lower reddish, fine-grained sandstone/siltstone belongs to the Thtf facies, and the upper tannish conglomerate, containing cobble- to boulder-sized chunks of much older rocks, belongs to the Thtc facies (both ~14.4 million years old). The relevant geologic map is is plate 1 from USGS Open-File Report 2007-1010 by L.S. Beard et al., currently available from the USGS as LakeMead-of2007-1010_plate1_map.pdf. The topographic basemap is the 1987 100,000 sheet, currently available from the USGS as NV_Lake Mead_321529_1987_100000_geo.pdf. You can use the base map to correlate positions on the geologic map. Climbing History Bob Cable and Julia Cronk may have been the first ascentionists in 1999 (Bob didn't want credit for a FA, even though there was no previous sign of ascent), rating the climb 5.7. Tracy Foutz carried an aluminum extension ladder to the base of the crux in 2012, and climbed the rest free. In 2015, Tracy brought the ladder back, enabling Courtney Purcell to climb without other gear. In 2019, Matt Below climbed it by trad methods and belayed and set (?) fixed ropes for Adam Walker. Ryan Cooper climbed by trad methods in May of 2020, and again March, 2021. Sara Weimar and Dan C Climbed
it Oct 17,
2021, using cams. Sara noted "There’s
also a weird string up there too that one shouldn’t trust for anything,
but I didn’t think to remove until we were down already." Again, it is 4000 lb Dyneema, as labelled. DON'T REMOVE it 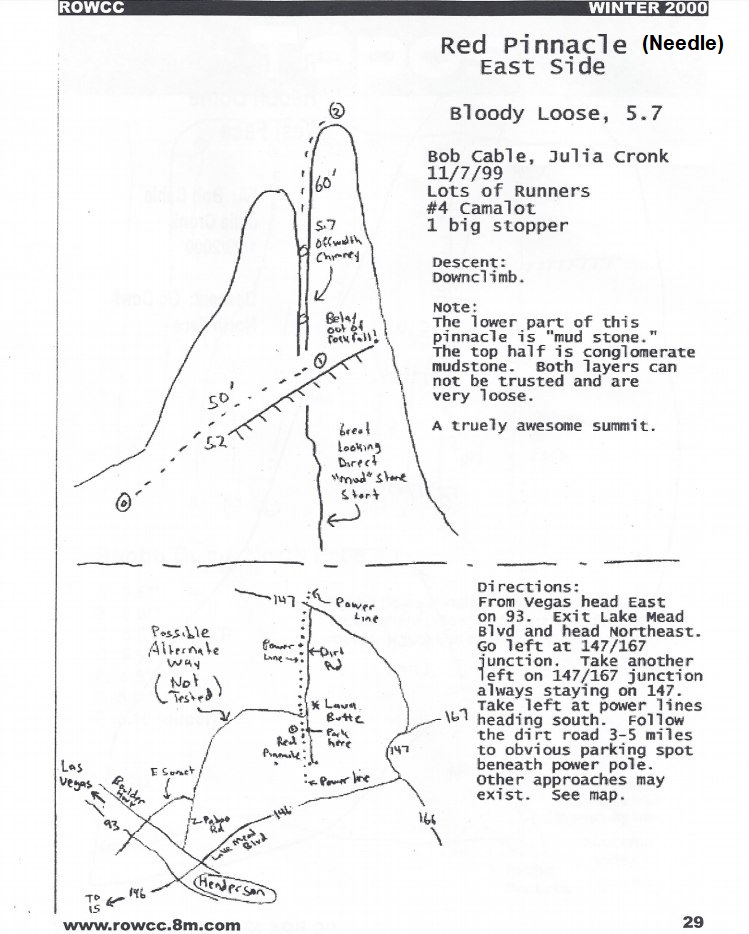 I haven't been able to exercise much since August 20, when I had a prostate operation. I got a very bad infection, and lost 8 pounds of muscle. Then I had a hernia operation a month before this climb. I'm still lean (for 65). |